Showing posts with label DIY. Show all posts

Wednesday, November 2, 2011

Laundry Room Redo

I was inspired by YHL's Pinterest Challenge to finally write up a project that we finished a few weeks ago. This was my inspiration for our laundry area:


Ha ha... it looks nothing like this. But, it was inspiring! I love the apron sink and the granite counter tops. Unfortunately, our laundry isn't even in a room. It's just a little closet off of our kitchen (with no space for a sink or counter top). We hadn't made any updates to it since we moved in, when it had a couple of particle-board shelves and a poor paint job. This isn't quite a before photo, but almost (we'd already taken the shelves out... they were disgusting!):


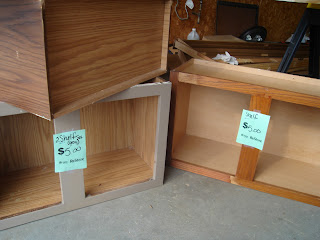
We had already decided that we wanted to hang some cabinets instead of shelves, but had a very limited budget. Enter the Habitat for Humanity ReStore! We picked up these three doorless cabinets for $10 total:


We painted the walls and the cabinets white, which really cleaned up the space. Unsurprisingly, the cats loved the open shelving.


To finish it off, I added pull-out baskets to the top cabinets and sewed a little skirt for the bottom cabinet. We keep our detergent, bleach, and softener in there, so it's nicely hidden out of sight. The top baskets hold additional laundry stuff, plus painting supplies. We love extra storage space!

Friday, September 2, 2011

Contact Paper Window

A couple of weeks ago, I saw this idea and got super excited. We have a door off our kitchen that leads to our backyard and deck. It's a pretty ugly door and it unfortunately faces our neighbor's deck (as does our deck). Frequently I have found myself looking right out our window at our neighbors grilling on their deck whenever I'm doing laundry or getting something out of the pantry. There's really no privacy, even when you are in the house. The window had cheap blinds when we moved in, but the cats soon disassembled them (and they were especially ugly to begin with) so we didn't replace them. So when I saw that I could potentially change this door for just a $6 roll of contact paper, I was thrilled!

Here is the door before, with the view off our deck and into our neighbors' yards:

That is two properties — our next door neighbor's with the light blue deck and the next house over with a red deck. Yikes! 
I followed the instructions (linked above) and cut out many, many, many shapes from contact paper. I ended up splitting up this project over several days so I wouldn't get burned out/have carpal tunnel from the scissors. I only bought one roll of contact paper (it's actually "clear" but shows up frosted on the window). I probably used about half of it. Here's the after photo:


And here's a close-up photo of the pattern: 


I love it! It looks stylish, gives us tons more privacy than we had before, lets in light, and only cost $6. 

Up next is the front door. I'm almost done painting it (coat two is currently drying in the garage!) and it looks awesome. I think it's the nicest paint job I've done yet. Which is great, as it's right on the front of the house and hard to miss ;)

Wednesday, August 10, 2011

Summer Fun

It's already starting to feel like fall--the last two days have been in the upper 70s instead of the 90s! But we're still wrapping up our super busy summer. We headed up to Rockford on July 23 for Art and Becky's wedding, where Adam reunited with the Posse:


Adam then went to Madison for a few days for a work-related seminar, while I hung out in Roscoe. After that, we headed up to Three Lakes, Wis., for some vacation time with his family. Now we're finally back home and not planning on traveling any time soon... this summer has worn us out. Luckily, other people seem to be traveling in our direction (Anne and Brian, Becky and Sam)!! Which is always super exciting. 

On the home improvement front, we've been stalled for some time due to travel and financial constraints. But now that we're back for a while--and since we've had a long break--we're excited to get started on some more projects. We have two more bedroom doors to install (we've been at this point for... approximately a year. Oops. See our first door installation here). We probably would have had them done by now, but when we went to Menards this weekend, they were sold out of the ones we needed! Instead, we spent last weekend buying paint that matches our existing doors so that we can make the trim the same color. We're also going to try painting some of the doors we don't want to replace: our linen closet, pantry, and entry closet doors.

We're using Pittsburg Paint for these, since that was the brand that the pre-painted doors came with. It matched wonderfully (even though it wasn't exactly the same), so we went with it. Seems to be working so far: 


We did prime before we painted, although we just went with a water-based primer... we decided that the doors weren't "real" wood (they're hollow and plywood-y feeling. Yes, that's the technical term.), so we just winged it with water-based primer, since it's soooo much easier to deal with. The bleed-through hasn't been bad so far (sometimes you can still see wood-colored stains through the paint, unless you use an oil-based product), so I am hoping that it will stay that way. I just finished the final coat of paint on that door, which is for the linen closet, so I am hoping we can put it up tomorrow and see how it looks!

Tuesday, March 29, 2011

DIY Chandelier

We've been thinking for some time about replacing the light over our kitchen table. The one that came with our house was fine, but was more of a ceiling mount deal (below) than the chandelier you might expect over the main dining area in the house.

We had looked somewhat for a new light, but hadn't seen anything too exciting. I decided it would be fun to try and redo one that I found at our local Habitat for Humanity ReStore. I am in looove with ours... cheap house-ish stuff! So cool! It's like a thrift store for your house. My plan: buy a light fixture with a shape I liked, then paint it whatever color we wanted. We picked out this gold one:

We picked out RustOleum Dark Bronze Hammered spray paint for this project. We used the black color, same brand, for our patio set and really liked it. I hung the light from the garage ceiling so I could spray it from all sides. I was going for an "oil rubbed bronze" look, but got more of a gray instead. Actually though, I really like it -- it doesn't match everything else in our house, which makes it look unique.

But, to skip back a step, we had never hung a chandelier before. It took us a few minutes to figure out how to shorten the length; basically, remove the chain links you don't want (they aren't solid, so you can pry them apart with pliers), and then pull the cord up and trim it. Here's Adam in action with the pliers:

But, the very, very best part was the PRICE. Everything at ReStore is used (and generally donated), so it is very inexpensive. This light had been there for a while, so it was marked down to $7.50. The spray paint was about $6.50. So total cost for this lamp: $14! Amazing. Because of that, we ended up splurging on the light bulbs. I wasn't sure what kind I wanted (it came with a couple different, non-matching bulbs, but we didn't like any of them). Then we saw these at Lowe's and had to have them! They were almost $4 apiece, so that brought our total light fixture cost up to $34... still not bad!

One thing we should have considered: since this hangs over the kitchen table, the cats can reach it. And Jack loves swatting it... uh oh.

Sunday, January 30, 2011

Ceiling fan switcheroo

On Friday night, we found ourselves at Home Depot picking up a few things (this is usually where we are on Friday night). We happened to walk by the fans, and decided that this weekend might be a good time to finally update our master bedroom ceiling fan. It had these can-type lights that blocked off lots of light, so it made the room really, really dark. Adam had installed a ceiling fan once before at his grandma's house, so we were confident we could do it!

Here, we've already removed the old fan and Adam is about to open the box with the new fan (which we got from Menard's... Home Depot didn't have a huge selection of fans, we discovered.)

The wiring was a challenge, since one of us (me!) had to hold up the fan above our heads, while the other (Adam) had to do all the electrical work. Here it is completed--with much more light than before!


We decided that the fan we took down should go to replace this ugly one in the guest bedroom. It has tacky gold accents, and people who've stayed in our guest room complained that it made a loud wobbly noise:

This was a bigger challenge, because we didn't have directions for installing this fan. And two of the screws that held it up in the other bedroom didn't work here, which frustrated us to no end... But finally, finally, we got it up and working!


Up next: replacing two more interior doors? Painting the bathroom? Decorating the office? Starting the trim? So many options...

Tuesday, January 25, 2011

More painting!

Saturday morning, we got up and decided that it would be a good idea to paint our guest bedroom. This is why:

Formerly a child's bedroom, it was all decked out in dark blue and bright orange (not sure if he was a Bears fan or an Illinois fan...) We weren't sure what color to go with, but ended up going with "Chocolate Froth" from Behr. It's definitely a lot more neutral than before:

We've now painted almost every wall in our house. Still up: the bathroom and the office, both of which are OK colors. But I think we'll still paint them :) No more orange walls left, though! Whew.